
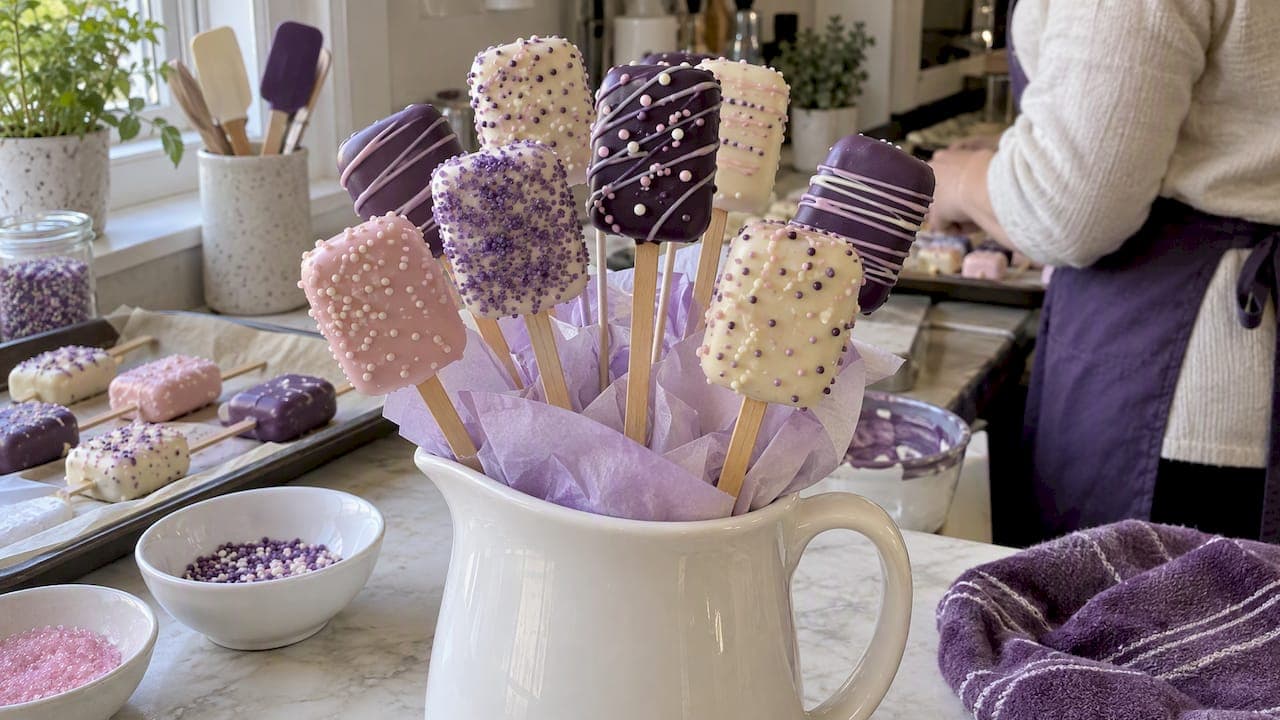
A cake pop bouquet is a small display of individually finished cake pops arranged on sticks, and you can make one at home with common supplies or order ready-made, customized pops from a local bakery. A successful bouquet comes down to three things: a fully set coating, a stable base, and a colour plan that holds together visually. Before you start assembling, it helps to understand the food-safety basics, which we cover below.
TL;DR:
- Proper setting of coating and anchoring of sticks are critical to preventing cake pops from falling apart in a bouquet.
- Fully chilling cake balls before dipping and inserting sticks, then allowing each pop to set completely, ensures stability in the display.
- Food-safe handling, including sanitizing surfaces, wearing gloves, and individually wrapping pops, reduces cross-contamination risks.
- DIY bouquets typically involve around 18 to 20 pops, but order customization offers personalized themes, colors, and finishes.
- Preparing and decorating cake pops requires advance planning, with baking and cooling done days ahead and final assembly close to the event.
Table of Contents
- Occasion-based cake pop bouquet ideas
- How to assemble a bouquet that actually holds together
- What to buy before you start
- Decoration techniques that get the popular looks
- Food-safety and packaging essentials
- A realistic timeline for cake pop prep
- Order a custom bouquet from London's Sweets instead
- FAQ
- Sources
Occasion-based cake pop bouquet ideas
The best bouquets start with a theme, then build colour and finish choices around it. Here are starting points you can adapt:
- Birthdays: bright colour blocking in two or three shades, simple sprinkles, and a mix of solid and drizzled pops for contrast.
- Weddings: soft, muted palettes such as blush and ivory, a clean hand-dipped coating, and small piped dots instead of busy sprinkles for a refined look.
- Baby showers: pastel colour blocking (mint, pale yellow, soft pink) with sugar crystals for texture and a gender-neutral palette when the occasion calls for it.
- Holidays: seasonal colour pairs like red and green or orange and black, finished with a simple drizzle in a contrasting shade.
- Corporate events: colours matched to a company palette, kept to one or two tones with minimal embellishment for a polished, consistent set.
Ribbon wrapped around the base and a few sprigs of paper filler between pops help balance the display without crowding it. When mixing finishes, keep one element consistent (either colour or topping) so the bouquet reads as a set rather than a pile of mismatched pops. Finishes like hand-dipped coating, drizzle, sugar crystals, and ordinary sprinkles are achievable at home and are also the finishes we offer on our own cake pops, so you can compare your results against a professional benchmark.
How to assemble a bouquet that actually holds together
A bouquet falls apart for one of two reasons: the coating never fully set, or the sticks were not anchored properly. Multiple how-to guides treat full chilling and setting time as non-negotiable before you move pops into a display, since sagging or detached pops are almost always a setting problem, not a recipe problem.
- Form and chill your cake balls fully before dipping, then dip the stick tip in melted coating before inserting it into each ball.
- Chill the dipped pops for 20 to 30 minutes so the coating hardens around the stick and anchors it in place.
- Dip each pop in its final coating, then stand it upright in a craft block or foam block until completely set.
- Insert set pops into your base (foam block or decorator bucket), working from the centre outward so taller pops anchor the shape.
- Fill gaps with paper or tissue filler to hide the base and keep pops from touching or leaning on each other.
Pro Tip: If a stick feels loose on a finished pop, remelt a small dab of coating, dip the exposed stick end, and reinsert before the bouquet goes anywhere.
What to buy before you start
Your shopping list splits into three categories: what gets eaten, what holds the display together, and what you use to decorate.
- Consumables: candy coating (melts), natural wood sticks, sprinkles, ribbon, and individual treat bags.
- Structural pieces: a foam block or floral foam, a decorator bucket or decorative container, and food-safe covers to wrap any foam before it goes near finished pops.
- Small equipment: a craft block with holes for drying pops upright, piping tips (petal tips if you want a floral look), dipping tools, and a clear, cool surface for setting.
Keep packaging food-grade wherever it touches a finished pop. Health Canada's packaging guidance is clear that materials in contact with food need to be clean and free of anything that could transfer into it, which rules out craft-store foam or containers that were not made for food use.
Decoration techniques that get the popular looks
A smooth hand-dipped finish depends on coating temperature and a steady, single dip rather than multiple passes, which tend to create drips and uneven thickness. Base colour matters too: a dark base under a light drizzle will show through, so plan your colour layers before you start dipping.
- Drizzle a contrasting colour in thin lines across the set coating, then add sugar crystals while the drizzle is still wet so they stick.
- For floral-style pops, petal piping tips and staged chilling let you build layered petal rows that read as a small flower once the layers set.
- Apply sprinkles immediately after dipping, while the coating is tacky, since they will not adhere once it firms up.
- Opaque toppings like sanding sugar can lighten the apparent colour underneath, so test a spare pop before committing to a full batch.
Pro Tip: If drizzle lines keep pooling instead of staying thin, your coating is likely too warm. Let it cool slightly before piping the next line.
Food-safety and packaging essentials
Refrigerated baked desserts fall into a tricky category because any decoration added after baking never gets heat-treated. A Canadian inspection report on refrigerated baked desserts found that indicator organisms can turn up in these products, and flagged post-baking decoration as a real cross-contamination risk. That makes sanitary handling during decorating and assembly worth taking seriously, not optional.
- Wash hands and sanitize work surfaces before you start dipping or piping.
- Wear gloves when handling finished pops to avoid touching coated surfaces directly.
- Wrap any non-edible structural material, like floral foam, completely in a food-safe liner so it never contacts an exposed cake surface.
- Individually wrap each finished pop in a food-grade treat bag once the coating is fully set, then seal with ribbon.
Individually wrapped pops are easier to hand out safely as favours and limit how much a single pop is handled before it reaches someone's hands, a simple trade-off between how a bouquet displays and how hygienically it travels.
A realistic timeline for cake pop prep
Cake pops are not a same-day project if you want clean results; mastering doughnut baking mix can offer helpful tips for perfectly fluffy treats similar to those needed for creating ideal cake pop textures (Mastering doughnut baking mix: tips for perfectly fluffy treats – Missy Lala's). Baking and cooling the cake typically takes under an hour combined, but crumbling, mixing with frosting, forming balls, and chilling before dipping adds several more hours, and each dipped pop needs 20 to 30 minutes to set properly before handling.
- Bake and fully cool the cake a day or two ahead, then crumble and mix with frosting.
- Form cake balls and chill them (ideally overnight) before inserting sticks and dipping.
- Dip, decorate, and let each pop set completely, which can take a full day if you are doing multiple colours or layers.
- Assemble the bouquet the same day it is needed or the evening before, keeping it in a cool spot away from direct heat until transport.
When transporting a finished bouquet, keep it upright, avoid direct sunlight or a hot car, and check that no pops have shifted or loosened before handing it off.
Order a custom bouquet from London's Sweets instead
If a DIY bouquet sounds like more hours than you have, we make that part simple. At London's Sweets, we hand-make every cake pop in our signature rounded-rectangle shape on a natural wood stick, finished with custom colours, hand-dipped coating, drizzle, sugar crystals, or ordinary sprinkles, so you choose the look and we handle the production.

We build orders around whatever you're celebrating, whether that's a birthday, a baby shower, a wedding, or a corporate event, and every order starts with a request through our website form so we can confirm details before accepting it.
- Handmade, individually wrapped cake pops in a distinctive shape.
- Custom colour themes and finishes matched to your event.
- Orders requested and reviewed through a website form before confirmation.
For current prices per dozen by product line, please refer to the pricing page on the bakery's website.
Paid delivery may be requested within approximately 100 km of Dundas, with exact address, timing, and fee confirmed before we accept your order. If you'd rather skip the chilling times and stick repairs, request your order and we'll take it from there.

FAQ
How can I make a DIY cake pop bouquet?
Form and chill your cake balls, dip the stick tip in coating before inserting it, then coat and fully set each pop before arranging them in a foam block or decorator bucket. Fill gaps with paper filler so the base is hidden and pops do not touch or lean on one another.
What is a common cake pop bouquet quantity?
There is no single official rule, but a common DIY setup uses around 18 to 20 cake pops arranged in a decorator bucket with a foam base and paper filler. Adjust the count based on your container size and how full you want the finished bouquet to look.
What is the best way to package cake pops?
Wrap each pop individually in a food-grade treat bag once the coating has fully set, then secure it with ribbon, which follows Health Canada's guidance that anything touching food needs to be clean and food-safe. This also keeps pops easy to hand out as individual favours.
How far in advance can I make cake pops?
You can bake the cake and form the cake balls a day or two ahead, chilling them until you are ready to dip. Final decorating and bouquet assembly are best done close to the event, since fully set coating is what keeps pops from sagging or falling once arranged.
Can I order a custom cake pop bouquet instead of making one?
Yes, we make custom cake pops at London's Sweets in colours and finishes you choose, with paid delivery available within approximately 100 km of Dundas once your order is confirmed. Pricing starts from $42 per dozen depending on the finish you select.
Sources
- Bacterial pathogens in pre-prepared, refrigerated baked desserts — Canadian inspection report
- Packaging materials for food — Health Canada
- Blooming Floral Cake Pops — Wilton
- How to fix cake pops that fall off the stick — The Takeout